Welcome to your comprehensive guide for creating polished, professional talking-head videos. In the fast-paced world of YouTube, consistency and quality are king. Skipping a single step can mean the difference between a viral hit and a video that falls flat. This video editing checklist is designed to be your trusted roadmap, guiding you from a folder of raw footage to a perfectly polished final product. It ensures no detail is overlooked, from the initial file import to the final upload.
Think of this checklist as your personal quality assurance system. It prevents the common, frustrating mistakes that can derail a great piece of content, like mismatched audio, inconsistent color, or a poorly paced narrative. Forgetting to normalize your audio levels can make your video unwatchable, while a simple color correction error can make you look unprofessional. A systematic approach eliminates these risks, allowing you to focus on the creative aspects of your edit.
This guide breaks down the entire process into 10 actionable steps, covering everything from foundational file organization to the final quality control checks before you hit publish. We will cover critical tasks like syncing your audio, trimming unnecessary pauses, polishing sound quality, and adding engaging graphics. Whether you're a seasoned creator looking to refine your process or a newcomer aiming to start strong, this checklist will help you streamline your workflow, avoid common pitfalls, and produce content that captivates your audience every single time. Let's dive in.
1. Log and Organize Footage
Before you even think about making the first cut, the most critical step in any professional video editing checklist is logging and organizing your footage. This foundational practice involves creating a systematic and logical structure for all your raw video clips, audio files, graphics, and other assets. It's the difference between a smooth, efficient edit and a chaotic, time-consuming nightmare.
Think of it like setting up your kitchen before you cook. You wouldn't just throw all your ingredients on the counter; you'd organize them so you can find exactly what you need, when you need it. In editing, this means establishing a clear folder structure and a consistent file naming convention before you start.
Why It's a Non-Negotiable First Step
Skipping this step is a recipe for disaster, especially as your projects grow in complexity. A well-organized project saves immense time by making assets easy to find, prevents the accidental deletion of crucial files, and makes collaboration with others seamless. Documentary filmmakers logging hundreds of hours of interviews and major studios like Netflix rely on meticulous asset management to handle massive amounts of data efficiently.
Key Insight: Your project is only as strong as its foundation. A clean, organized project file is the bedrock of a successful and stress-free edit.
Actionable Tips for Implementation
To get started, create a master template folder that you can duplicate for every new video project. This ensures consistency every single time.
- Standardize Naming Conventions: Create a simple, repeatable formula. A great starting point is
[ProjectName]_[Date]_[Scene/Topic]_[TakeNumber]. For example:ClientA-Explainer_2024-07-15_Intro_Take02.mp4. - Create a Logical Folder Structure: Your master folder should contain subfolders for every type of asset. A typical structure might include:
01_Footage(with subfolders for each camera angle)02_Audio(for external microphone recordings)03_Graphics(for logos, lower thirds, etc.)04_ProjectFiles(for your editing software files)05_Exports(for final video renders)
- Log Your Best Takes: As you review your footage, create a simple text document or spreadsheet. Note the filename and timecode of your best takes, any mistakes, or particularly good moments. This "paper edit" will guide you later, saving you from re-watching everything.
- Backup Everything: Once organized, immediately back up your entire project folder to a separate hard drive or cloud storage. Data loss is a real threat.
While manual organization is powerful, AI-powered tools are emerging to streamline these initial steps. For creators looking to automate parts of their workflow, you can explore how tools on Tubentum.com can help manage and prepare your content for a faster edit.
2. Perform Color Correction
Once your footage is organized and your rough cut is in place, the next step in a professional video editing checklist is color correction. This is the technical process of adjusting your video clips to achieve a consistent and accurate look. It involves correcting exposure, fixing white balance, and ensuring all your shots match one another, creating a seamless viewing experience.
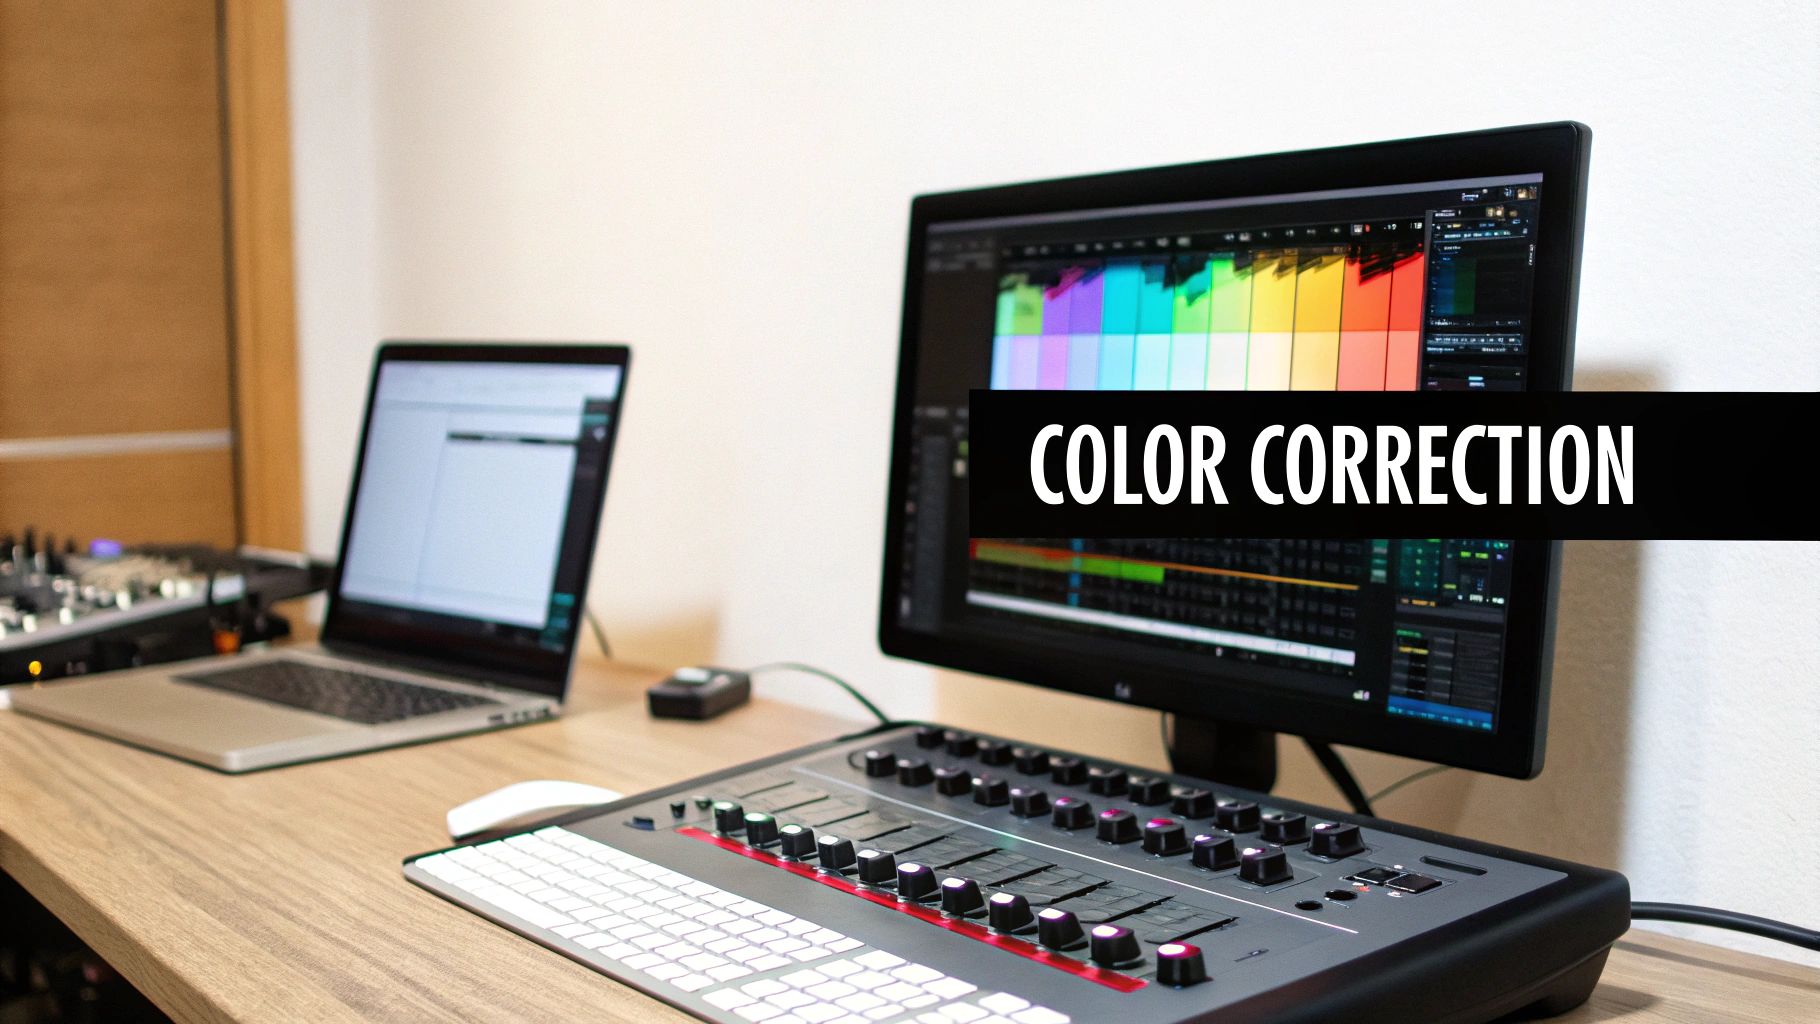
Think of color correction as cleaning the canvas before you paint. It’s not about creating a stylized look yet; that’s color grading. Correction is about creating a neutral, clean, and balanced starting point so that every clip looks like it was shot under the same ideal conditions.
Why It's a Non-Negotiable First Step
Skipping color correction makes your video look amateurish and jarring. Inconsistent lighting or shifting white balance between shots can distract viewers and pull them out of your content. Major studios like Netflix and renowned cinematographers like Roger Deakins rely on meticulous color work to maintain visual continuity and professional quality. For talking-head videos, it ensures your skin tones look natural and your background remains consistent.
Key Insight: Color correction is about technical accuracy, not creative style. You must fix problems with the image before you can enhance it artistically.
Actionable Tips for Implementation
To properly color correct your footage, you must rely on your software’s tools, not just your eyes. Our perception of color can be easily tricked by the lighting in our room or the settings on our monitor.
- Use Your Scopes: Learn to read your video scopes like the Waveform, Vectorscope, and RGB Parade. These tools provide objective data about your image's brightness, color, and saturation, allowing you to make precise adjustments.
- Correct in Order: Follow a standard workflow. First, adjust exposure (brightness and contrast). Second, fix the white balance to remove any unnatural color casts. Finally, adjust saturation to make colors look lifelike.
- Calibrate Your Monitor: Ensure what you see is accurate. Use a monitor calibration tool to set your screen to industry standards, so your video looks right on all devices.
- Create Correction Presets: If you shoot in the same location with similar lighting, save your correction settings as a preset or LUT (Look-Up Table). This will speed up your workflow for future videos.
By mastering the basics of color correction, you lay the groundwork for a polished, professional final product that holds your audience's attention.
3. Sync Audio and Video
Once your footage is organized, the next crucial step in your video editing checklist is synchronizing your audio and video. This is the process of aligning separately recorded audio, like from a high-quality external microphone, with the corresponding video footage from your camera. Getting this right is fundamental for a professional-sounding and looking final product.
Think of it as the digital equivalent of a movie clapperboard. Its sole purpose is to ensure what your audience hears perfectly matches what they see on screen, eliminating distracting lip-sync errors. Without precise synchronization, even the best content can feel amateurish and unwatchable, quickly causing viewers to click away.
Why It's a Non-Negotiable Step
For talking-head videos, where your connection with the audience is paramount, out-of-sync audio is a deal-breaker. If your words don't match your lip movements, it breaks the viewer's immersion and trust. This step ensures that the crisp, clean audio from your dedicated microphone is the star, while the lower-quality camera audio is discarded, dramatically elevating your production value.
Key Insight: Great video is built on great audio. Proper synchronization is the bridge that connects high-quality sound to your visuals, making the final product seamless.
Actionable Tips for Implementation
Most modern editing software has built-in tools to make this process simple, but a little preparation during filming can make it foolproof.
- Create a Clear Sync Point: Before you start talking, perform a single, sharp hand clap in front of your face. This creates a clear spike in the audio waveform and a distinct visual cue, making it easy to align the two clips manually if needed.
- Use Automated Sync Features: In software like Adobe Premiere Pro or DaVinci Resolve, select both your camera clip (with its scratch audio) and your external audio clip. Right-click and choose "Synchronize," then select "Audio" as the sync method. The software will analyze the waveforms and align them automatically.
- Always Record Scratch Audio: Make sure your camera is recording audio, even if it's low quality. This "scratch track" is what editing software uses as a reference to automatically sync with your high-quality external audio file.
- Check for Drifting: For longer recordings, scroll to the end of the clips after syncing to ensure they haven't "drifted" out of sync. If they have, you may need to make small manual adjustments.
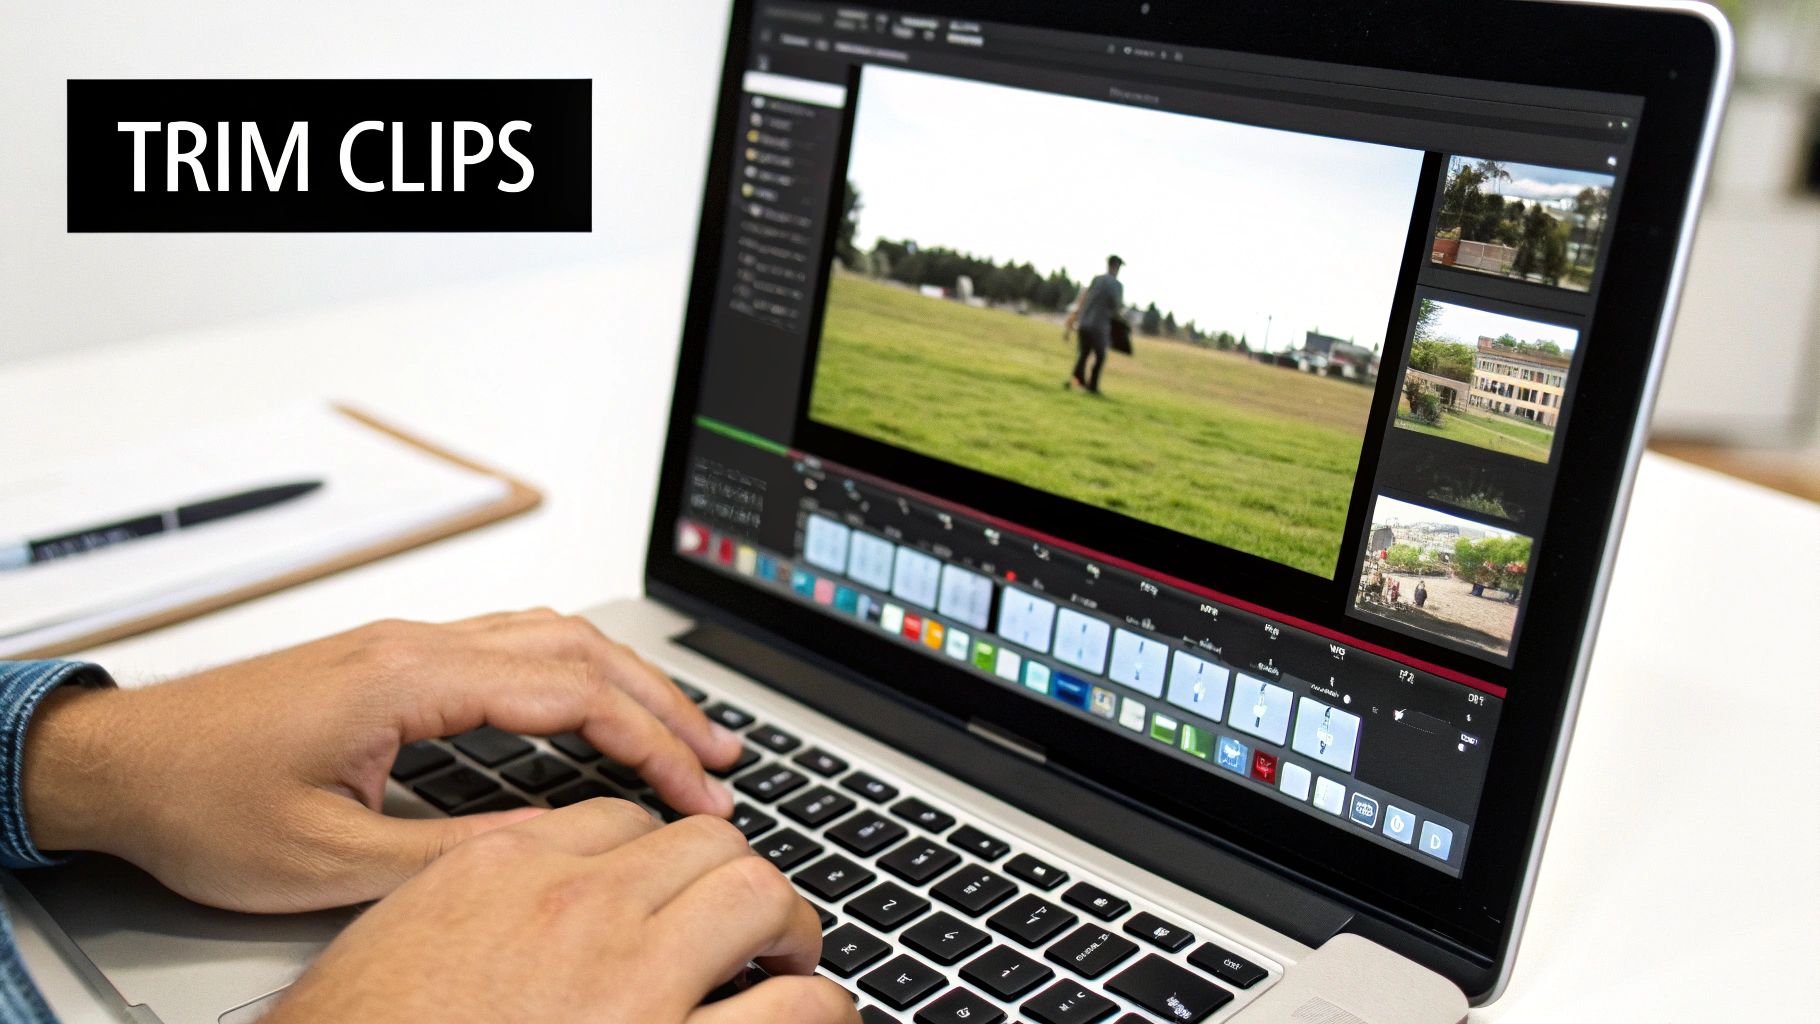
4. Cut and Trim Footage
Once your project is neatly organized, you can move into the heart of the editing process: cutting and trimming your footage. This fundamental step involves selecting the best parts of your clips, removing mistakes and unusable sections, and assembling them into a coherent sequence. This is where you build the structural foundation of your video, establishing its narrative flow and overall pacing.
Think of yourself as a sculptor with a block of marble. Your raw footage is the marble, and your job is to chip away everything that isn't part of the final masterpiece. Every cut, trim, and clip placement directly shapes the viewer's experience, determining the rhythm and energy of your story.
Why It's a Non-Negotiable Core Skill
This is the most essential task in any video editing checklist because it dictates the entire story. A well-cut video feels effortless and engaging, while a poorly cut one feels disjointed and confusing. Legendary film editor Walter Murch perfected this craft, understanding that each cut is an emotional and narrative decision. For a YouTube creator, sharp, decisive cuts keep the audience hooked and the energy high, preventing them from clicking away.
Key Insight: Great editing isn't about what you add; it's about what you take away. The art of the cut is in knowing what to remove to make the remaining story stronger.
Actionable Tips for Implementation
To build your initial sequence, focus on creating a "rough cut" first. This is a basic assembly of your best takes in chronological order, without any fancy effects or sound design.
- Master Keyboard Shortcuts: Speed up your workflow exponentially by using keyboard shortcuts. The
J,K, andLkeys for reverse, pause, and forward playback are universal. Learn the shortcuts for setting in/out points (IandO) and making cuts (Ctrl+KorCmd+K). - Leave Handles: When trimming clips, leave a few extra seconds of footage at the beginning and end. These "handles" give you flexibility later when you want to add transitions or fine-tune the timing of a cut.
- Use Markers: While reviewing your footage, drop markers on the timeline to flag great moments, mistakes, or potential cut points. This allows you to quickly navigate to key sections without re-watching entire clips.
- Review in Context: Don't just judge a cut in isolation. Play back the sequence of clips to feel the rhythm and pacing. Does the transition feel natural? Does the flow make sense? Adjust as needed to ensure a smooth viewing experience.
Making precise cuts manually can be time-consuming. For creators looking to accelerate their rough cut, tools on Tubentum.com can automatically identify and remove silences and filler words, giving you a tightly edited foundation in minutes.
5. Add Transitions and Effects
Once your rough cut is assembled and the core narrative is in place, the next step in a comprehensive video editing checklist is to strategically add transitions and effects. This is the stage where you polish the flow between clips and inject creative flair through motion graphics, stylistic choices, and visual enhancements. Done well, these elements guide the viewer's eye, signal shifts in time or topic, and elevate the overall production value.
Think of transitions and effects as the punctuation in your visual story. A simple cut is a period, a dissolve can be an ellipsis suggesting a passage of time, and a dynamic wipe can act as an exclamation point. The goal is to enhance the narrative, not to distract from it with flashy, unmotivated effects.
Why It's a Non-Negotiable Step
Purposeful transitions and effects are essential for creating a professional and engaging video. They prevent jarring jumps between shots, help maintain a consistent pace, and can visually represent abstract ideas. Creators like Film Riot and Corridor Crew demonstrate how even subtle effects can transform a simple sequence into a compelling story, while the iconic "Ken Burns effect" on still images in documentaries shows how motion can bring static assets to life.
Key Insight: Transitions and effects should always serve a purpose. Ask yourself, "Does this help tell the story, or is it just a gimmick?" The best effects are often the ones the audience doesn't consciously notice.
Actionable Tips for Implementation
The key is to use these tools with intention and restraint. A clean, hard cut is the professional standard and should be your default for 90% of your edits.
- Use Transitions Purposefully: Reserve specific transitions for specific purposes. For example, use a simple cross dissolve to signify a short passage of time or a change in location. A fade to black is a powerful way to end a section or the entire video.
- Keep It Consistent: Establish a consistent visual language for your video. If you use a specific type of wipe or push transition to introduce a new topic, stick with it throughout the video so your audience learns what to expect.
- Avoid Overly Trendy Effects: That cool glitch effect you see everywhere on TikTok might look dated in six months. Stick to timeless, subtle effects that won't age your content prematurely.
- Customize Presets: Most editing software comes with built-in effect presets. Use these as a starting point, but always tweak the parameters like duration, speed, and intensity to better fit the unique pacing and style of your video.
- Focus on Subtlety: Subtle zooms, motion graphics that highlight key information, and gentle color grading effects are often more impactful than loud, in-your-face animations. Less is almost always more.
6. Mix and Balance Audio Levels
Once your visual story is taking shape, the next crucial item on your video editing checklist is audio. Poor sound quality can ruin an otherwise great video. Mixing and balancing audio levels is the technical process of adjusting the volume of all your sound elements, like dialogue, background music, and sound effects, to create a clear, professional, and pleasant listening experience.

Think of it as conducting an orchestra. Each instrument has its part, but they must be balanced so the main melody (your voice) stands out without being drowned by the supporting instruments (music and effects). This process ensures your dialogue is always crisp and audible while the music sets the mood and sound effects add impact without overwhelming the viewer.
Why It's a Non-Negotiable Step
Viewers are far more likely to forgive mediocre video quality than bad audio. If your audience has to strain to hear you or is blasted by overly loud music, they will click away instantly. Proper audio mixing ensures a consistent listening experience from start to finish. Major platforms like YouTube and Netflix enforce loudness standards (like -14 LUFS for YouTube) to prevent jarring volume shifts between videos, making this a technical requirement for professional content.
Key Insight: Great audio is invisible; bad audio is all you notice. Your goal is to make the sound experience so seamless that the viewer focuses entirely on your message, not the volume knob.
Actionable Tips for Implementation
To achieve a professional sound, you need to be both technical and creative. Use your editing software’s audio tools to make precise adjustments.
- Follow Platform Loudness Standards: The standard for YouTube is around -14 LUFS (Loudness Units Full Scale). Use a loudness meter plugin in your editor to check your final mix and ensure it hits this target. This prevents YouTube from compressing or lowering your audio volume automatically.
- Create Separate Tracks: Keep your audio organized by placing different types of sound on their own tracks. Dedicate separate tracks for
Dialogue,Music,Sound Effects (SFX), andAmbiance. This makes it much easier to adjust levels for each category independently. - Set Dialogue as Your Anchor: Your voice is the most important element. Set your dialogue levels first, typically peaking between -6 dB and -12 dB. Then, mix all other audio elements around your voice. Background music should generally sit 15-20 dB below your dialogue.
- Use Automation and Keyframes: Don't just set a single volume level for your music and leave it. Use keyframes to "duck" the music volume down when you speak and raise it during pauses or visual-only segments. This dynamic mixing keeps the energy up without competing with your voice.
7. Apply Color Grading and Creative Styling
After you’ve corrected the technical aspects of your image, the next crucial item on your video editing checklist is color grading. This is the artistic step where you move beyond simply fixing exposure and white balance to intentionally shaping the mood, tone, and emotional impact of your video. It’s how you develop a signature visual style that makes your content instantly recognizable.
Think of color correction as preparing a blank canvas, while color grading is the actual painting. This is where you apply specific looks, use creative LUTs (Look-Up Tables), and adjust hues to tell a story. A warm, golden grade can make a scene feel nostalgic and inviting, while a cool, blue-toned palette can evoke a sense of seriousness or melancholy.
Why It's a Non-Negotiable Finishing Touch
Color grading is what separates amateur-looking footage from polished, professional content. It establishes brand identity and supports your narrative. For talking-head videos, a consistent color grade across all your content helps build a cohesive brand look, making your channel feel more authoritative and trustworthy. Renowned colorists like Stefan Sonnenfeld have built careers on using color to enhance the storytelling in major films, a principle that applies directly to YouTube content.
Key Insight: Color is a powerful emotional tool. Your grading choices should always serve the story you're telling or the brand identity you're building.
Actionable Tips for Implementation
To create a professional and consistent look, focus on developing a repeatable color grading workflow.
- Find Your Style: Before you touch any color wheels, find reference images or videos that have the look you want. This gives you a clear target to aim for during the grading process.
- Use LUTs as a Starting Point: Creative LUTs can give you a professional look quickly. Apply a LUT and then use it as a base, fine-tuning the intensity and making small adjustments to fit your specific footage.
- Grade Globally, then Locally: Apply a primary grade to your entire timeline to establish a consistent base look. Then, use masks or secondary color correction tools to make specific adjustments to certain parts of the image, like enhancing skin tones or making a product's color pop.
- Balance Style with Clarity: While creative grades can be impactful, ensure they don't compromise the clarity of your video. Your subject should remain clear, and important details shouldn't be lost in overly dark shadows or bright highlights.
For creators looking to deepen their understanding of how visual styling impacts audience perception, you can find more advanced tips on the Tubentum blog.
8. Add Text, Titles, and Graphics
Once your core narrative is assembled, the next step in a professional video editing checklist is to add text, titles, and graphics. This layer of visual information enhances the viewer's understanding by providing context, reinforcing key points, and establishing a consistent brand identity. It's how you communicate crucial information that isn't spoken, such as a speaker's name, a key takeaway, or a call to action.
Think of text and graphics as the signposts in your video. A well-placed title card signals the beginning of a new section, a lower third identifies who is speaking, and an animated graphic can illustrate a complex idea in a simple, engaging way. Done correctly, these elements guide the audience without distracting them from the main content.
Why It's a Non-Negotiable Step
Neglecting this step leaves your video feeling incomplete and less professional. On-screen text helps with viewer retention by making information easier to digest and remember. For talking-head videos, lower thirds add authority and context. In tutorials, text overlays are essential for highlighting steps and providing instructions. Major news networks and top YouTube creators alike rely heavily on graphics to present information clearly and maintain a polished, recognizable brand.
Key Insight: Strategic use of text and graphics transforms a simple video into a polished, communicative, and professional piece of content that holds viewer attention.
Actionable Tips for Implementation
To ensure your graphics enhance rather than clutter your video, focus on readability, consistency, and purpose. Every element should have a reason for being on screen.
- Prioritize Readability: Use clean, sans-serif fonts (like Helvetica or Arial) that are easy to read on any screen size. Ensure there is high contrast between the text and the background; a subtle drop shadow or outline can make white text pop against a busy background.
- Establish a Consistent Style: Define your brand's fonts, colors, and graphic styles and stick to them. This includes your intro titles, lower thirds, and call-to-action cards. Consistency builds brand recognition and gives your content a cohesive, professional feel.
- Respect Safe Zones: Keep all essential text and graphics within the title-safe area. This ensures nothing gets cut off when viewed on different devices or screen aspect ratios, from a wide-screen TV to a vertical mobile phone display.
- Keep It Concise: Don’t overwhelm the viewer with a wall of text. Limit on-screen text to a few key words or a short phrase. If you need to convey more information, break it up across multiple graphics or use it to supplement what is being said.
For creators looking to generate dynamic text and graphics quickly, automated tools can be a game-changer. Platforms like Tubentum.com offer features that can help streamline the creation of branded titles and captions, ensuring your videos look polished without the extra manual effort.
9. Export and Optimize for Distribution
The final step in your video editing checklist is exporting the project, which is the process of rendering your edited timeline into a single, shareable video file. This isn't just about clicking "Export"; it's about optimizing the video's format, resolution, and bitrate for the specific platforms where your audience will watch it. Getting this wrong can result in poor quality, huge file sizes, or upload errors.
Think of it as packaging a product before it ships. You wouldn't put a fragile item in a flimsy bag; you'd choose the right box and materials to ensure it arrives perfectly. Similarly, exporting with the correct settings ensures your video looks its best on YouTube, Instagram, or any other destination, delivering the high-quality experience you worked so hard to create.
Why It's a Non-Negotiable Final Step
A masterpiece of an edit can be ruined by a poor export. Each platform, from YouTube to Netflix, has its own technical specifications designed to provide the best viewing experience for its users. Exporting a generic file ignores these nuances and can lead to visual artifacts, compressed audio, or unnecessarily long upload times. Major YouTube creators meticulously follow the platform’s recommended settings to maximize quality and ensure their content is processed efficiently by YouTube’s servers.
Key Insight: Your video isn't truly finished until it's correctly encoded and optimized for the platform where it will live. The export process is the final quality gate your content must pass through.
Actionable Tips for Implementation
To avoid last-minute headaches, create and save export presets for each platform you regularly post to. This ensures consistency and saves you from having to remember complex settings for every video.
- Follow Platform Guidelines: Always use the recommended export settings for your target platform. For YouTube 1080p, this typically means the H.264 codec with an 8-10 Mbps bitrate and AAC audio.
- Export a High-Quality Master File: Before creating platform-specific versions, render a high-quality master file (like an Apple ProRes or DNxHD file). This is your archival version, which you can use to create other formats later without losing quality.
- Create Platform-Specific Versions: Your YouTube export will differ from your Instagram Reels or TikTok export. Create separate versions optimized for each, paying attention to aspect ratios (16:9 for YouTube, 9:16 for vertical video), resolution, and file size.
- Name Exports Clearly: Use a consistent naming convention to keep track of your files. For example:
ProjectName_Master.mov,ProjectName_YouTube_1080p.mp4, andProjectName_Instagram_Reels.mp4. - Test Before Uploading: Do a quick spot-check of the final exported file on your computer and phone to ensure there are no glitches, dropped frames, or sync issues before you upload it.
For a deeper dive into the latest recommended settings, you can explore various resources that break down the technical requirements for different platforms. To learn more about how to prepare your content effectively, you can find valuable insights at Tubentum.com's resources.
10. Review, Proofread, and Quality Control
After countless hours of cutting, color correcting, and sound mixing, it's tempting to hit "Export" and be done. However, the final quality control (QC) pass is the last line of defense between you and a preventable mistake. This stage involves a meticulous review of your entire video to catch any technical errors, creative inconsistencies, or simple typos before it goes live.
Think of it as the final proofread before publishing a book. No matter how great the story is, a glaring spelling error on the first page can immediately undermine its credibility. The same principle applies to video; a small audio glitch, a misspelled lower third, or an out-of-sync clip can distract your audience and damage your professional image.
Why It's a Non-Negotiable Final Step
Skipping a thorough QC process is a massive gamble. It risks publishing content with errors that can range from embarrassing (like a typo in a client's name) to technically disastrous (like a corrupted export file). Major broadcasters and platforms like Netflix have entire departments dedicated to quality control, ensuring every frame meets strict technical and creative standards before it reaches an audience. This final check preserves your video’s integrity and your reputation as a creator.
Key Insight: Your final video is a direct reflection of your brand's quality. A dedicated QC process ensures that reflection is polished, professional, and error-free.
Actionable Tips for Implementation
To make your review process effective, you need to be systematic. Treat it as a distinct phase of your video editing checklist, not an afterthought.
- Watch on Different Devices: View your final export on a phone, a laptop, and a larger monitor if possible. Colors and audio can appear differently across devices, and this helps catch issues your audience might see.
- Focus on One Element at a Time: Watch the video through multiple times, each with a specific focus. First, watch for pacing and story. Next, listen only to the audio for pops, hiss, or inconsistent levels. Finally, read all on-screen text for spelling and grammar.
- Get a Fresh Pair of Eyes: After staring at a project for hours, you can become blind to its flaws. Ask a friend or colleague to watch the final version. They will almost always spot something you missed.
- Create a QC Checklist: Standardize your process by creating a simple checklist. Include items like:
- Audio is in sync throughout.
- No audio peaks or distortion.
- Color is consistent between all shots.
- All graphics and text are spelled correctly.
- Intro and outro are attached correctly.
- Export settings match platform requirements.
10-Step Video Editing Checklist Comparison
| Task | 🔄 Implementation Complexity | Resources / Requirements | ⚡ Speed / Efficiency | 📊 Expected Outcomes | ⭐ Key Advantages & Ideal Use Cases 💡 |
|---|---|---|---|---|---|
| Log and Organize Footage | Medium — initial setup and discipline required | Storage, organized folder/bins, metadata tools, proxy workflow | Slow upfront, much faster downstream | Faster edits, fewer lost assets, smoother collaboration | Saves time and prevents confusion; ideal for large shoots, documentaries, multi-camera projects |
| Perform Color Correction | High — technical skills and calibrated environment | Calibrated monitor, color grading software (DaVinci, Premiere), scopes | Medium–slow depending on footage volume | Consistent exposure/white balance, broadcast-compliant footage | Produces polished, neutral base for grading; essential for episodic, commercial, cinematic work |
| Sync Audio and Video | Medium — often automated but can be manual and meticulous | Timecode/clapper, reference audio, NLE auto-sync tools | Fast with good reference; slow if manual fixes needed | Accurate lip-sync, aligned multi-source audio, ready-for-mix timeline | Eliminates sync issues; critical for dialogue-heavy shoots, live events, music videos |
| Cut and Trim Footage | Medium — requires editorial judgment and repetition | NLE software, keyboard shortcuts, organized bins | Generally efficient; scales with project length | Clear narrative structure and pacing, usable rough cut | Core editing step; ideal for all projects to shape story and rhythm |
| Add Transitions and Effects | Medium–High — creative + technical skills, rendering time | Motion/VFX software, plugins, GPU acceleration | Variable — simple cuts quick, heavy VFX slow | Improved flow or stylized visuals; risk of distraction if overused | Enhances engagement and style; best for music videos, commercials, branded content (use purposefully) |
| Mix and Balance Audio Levels | High — technical listening skills and standards knowledge | Studio monitors/headphones, metering tools, audio plugins | Slow — careful adjustments and revisions | Clear, balanced audio, LUFS-compliant mixes, intelligible dialogue | Major impact on viewer experience; required for podcasts, films, streaming deliverables |
| Apply Color Grading & Creative Styling | High — artistic decisions and color expertise | Grading software, LUTs, calibrated display, reference images | Slow — iterative creative process | Distinct visual tone, emotional emphasis, brand consistency | Establishes cinematic/brand look; suited to films, series, branded campaigns |
| Add Text, Titles, and Graphics | Low–Medium — design sense important | Motion/graphics tools, fonts, templates, safe-area guides | Fast to medium with templates; custom design slower | Clear identification, accessibility (captions), improved branding | Improves clarity and engagement; used in tutorials, news, social clips, corporate videos |
| Export and Optimize for Distribution | Medium — requires platform specs knowledge | Encoding tools, storage, presets, multiple export targets | Slow render times; optimized exports improve upload speed | Platform-compliant files, good quality-size balance, fewer re-encodes | Ensures correct playback and delivery; essential for YouTube, streaming, broadcast |
| Review, Proofread, and Quality Control | Medium — thorough and often iterative | Multiple devices/screens, QC checklist, peer reviewers | Slow — multiple passes required | Catch errors, ensure standards compliance, polished final product | Prevents release issues and protects reputation; final step for all professional deliveries |
Automate Your Workflow and Elevate Your Content
You've made it through the comprehensive video editing checklist, a step-by-step roadmap designed to transform your raw footage into polished, professional content. By methodically moving from logging footage and syncing audio to final quality control, you've replaced guesswork with a reliable system. This isn't just a list; it's a framework for consistency and quality that ensures no detail is overlooked.
Embracing this checklist means you're committing to a higher standard. You're ensuring your color correction is balanced, your audio is crisp and clear, your pacing is engaging, and your final export is optimized for your platform. Each step, from the initial cuts to the final thumbnail check, is a crucial part of the puzzle that creates a seamless viewing experience for your audience.
Turning a Checklist into a Habit
The true power of this video editing checklist emerges when it becomes second nature. At first, you might need to reference it frequently, but over time, these steps will become an ingrained part of your creative process. You'll begin to instinctively check for audio peaks, assess color grades, and scrutinize your cuts for pacing without even thinking about it.
This mastery frees up your mental energy. Instead of worrying if you’ve missed a technical step, you can focus on the more creative aspects of your content:
- Storytelling: How can you arrange your clips to tell a more compelling story?
- Visual Flair: What unique graphics or B-roll could enhance your message?
- Emotional Impact: How can you use music and sound design to evoke a specific feeling?
When the technical foundation is solid, your creativity has the space it needs to flourish, allowing you to produce content that not only looks professional but also deeply connects with your viewers.
The Smartest Shortcut: Strategic Automation
For talking-head creators, the most significant bottleneck is often the "rough cut" phase. Sifting through hours of footage to remove every "um," awkward pause, and repeated take is tedious and time-consuming. This is precisely where modern technology can revolutionize your workflow.
Key Insight: The goal isn't to automate creativity, but to automate the repetitive tasks that drain your creative energy. By automating the initial, mechanical cuts, you reclaim valuable time for storytelling and polishing.
This is where AI-powered tools come into play. Imagine uploading your raw footage and having a tool automatically identify and slice out all the dead air and filler words. Consider a system that analyzes your entire recording, finds your most compelling statement, and automatically places it at the beginning to serve as a powerful hook. This isn't a future concept; it's a practical solution available today.
By integrating smart automation into your video editing checklist, you’re not cutting corners; you're making a strategic decision to work smarter. You bypass the most draining part of the process and jump straight to the refining and creative stages. This efficiency is a game-changer, enabling you to produce more high-quality content in less time, which is the ultimate key to growing your channel and impact.
This checklist is your guide to creating exceptional videos. Use it to build a solid foundation, then leverage automation to accelerate your process. By combining a disciplined workflow with smart tools, you’ll unlock a new level of productivity and creative freedom, setting your content apart in a crowded digital landscape.
Ready to slash your editing time and implement the smartest part of this video editing checklist? Let Tubentum handle the tedious work of cutting silences, filler words, and finding your best hook automatically. Visit Tubentum to see how you can reclaim hours of your time and focus on what truly matters: creating amazing content.