Before you even think about making your first cut, you need a plan. The secret to editing videos quickly and without pulling your hair out doesn't happen in the timeline—it starts with getting organized.
Great editing is built on a solid foundation. If you skip this part, you'll inevitably waste hours digging for files, wrestling with technical glitches, and killing your creative flow. Setting up a smart, repeatable workflow is the single best thing you can do to save time and sanity.
Think of it like a chef preparing for a dinner service. They don't just start throwing ingredients in a pan. They meticulously arrange their station—a practice called mise en place—so everything is exactly where it needs to be. Your video files, graphics, and audio clips are your ingredients. Let's get them in order.
Create a Smart Folder Structure
First things first: before you even launch your editing software, create a main folder for your new video project. Inside that folder, make a few subfolders to keep every single asset organized. This simple habit is a game-changer, preventing the all-too-common chaos of files scattered across your desktop.
A professional folder structure usually looks something like this:
- 01_Footage: All your raw video files live here.
- A-Roll: This is your primary footage, like your talking-head shots.
- B-Roll: All the supplementary clips, screen recordings, and other visuals.
- 02_Audio: Every sound-related file has a home here.
- Voiceover: Any narration you recorded separately.
- Music: Your background tracks.
- SFX: Sound effects.
- 03_Graphics: For your logos, lower thirds, and any on-screen animations.
- 04_Project_Files: This is where you save the actual project file from your editor (e.g., your Premiere Pro or DaVinci Resolve file).
- 05_Exports: Your final, rendered videos go here.
This system means you can find any file in seconds. It might seem like overkill for a short video, but when projects get complex, it’s a lifesaver. Plus, it makes your projects portable if you ever need to hand them off or move to a new computer.
Ingest and Configure Your Project Correctly
With your files neatly organized, it’s time to bring them into your editing software and set up your project. Getting this right from the very beginning prevents a world of technical pain later, like choppy playback or weird-looking exports.
The two most important settings to lock in are your resolution and frame rate. A golden rule of editing is to always match these to your source footage. If you shot your video in 4K at 30 frames per second (fps), your project timeline needs to be set to those exact same specs. A mismatch here can cause dropped frames, stuttering, and an overall drop in quality. Nobody wants that.
This simple flow is what separates the pros from the amateurs.
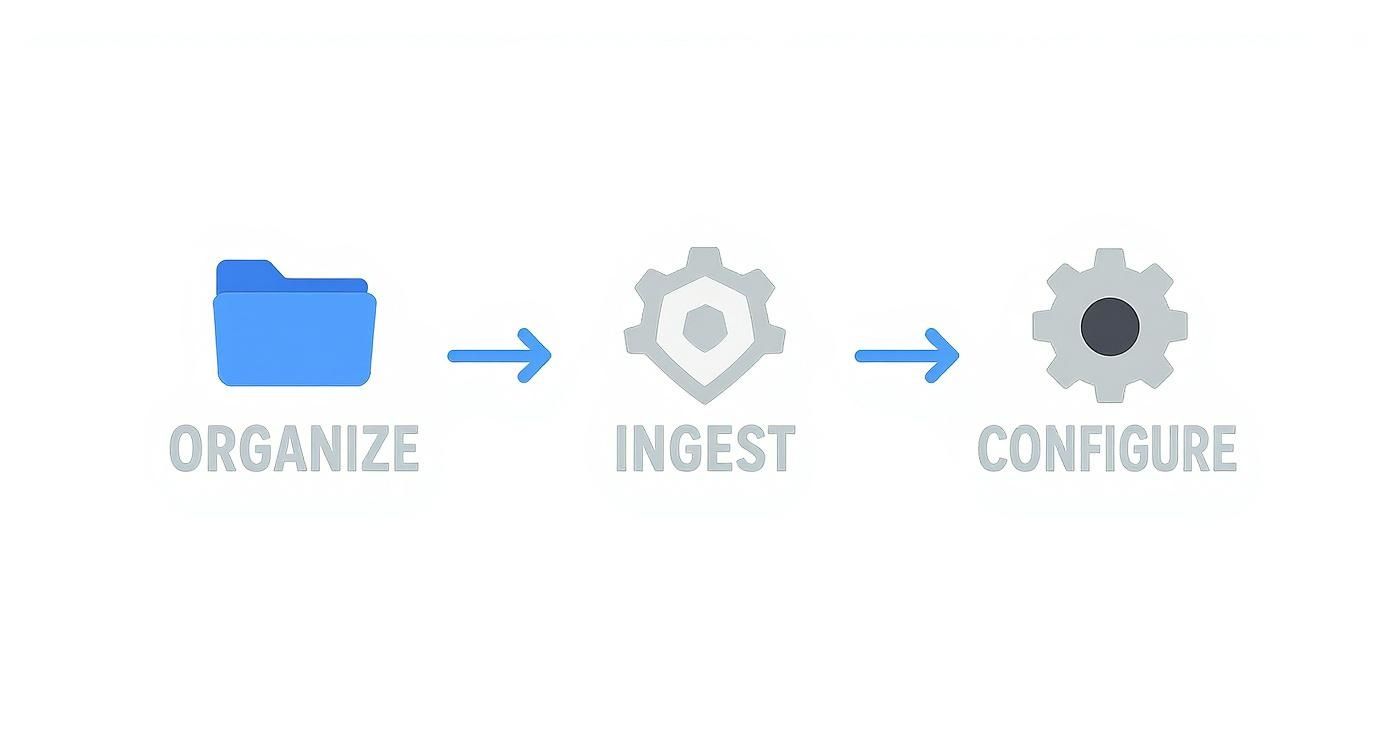
This "Organize, Ingest, and Configure" process is the standard for a reason: it takes the guesswork out of the setup and gets you to the creative part faster.
When your setup is systematic, you free up mental energy for what really matters—storytelling, pacing, and making your video engaging. A clean start almost always leads to a clean finish.
With an unbelievable 500 hours of video uploaded to YouTube every single minute, you need more than just good ideas to stand out. You need a polished, professional presentation. That polish starts with a rock-solid workflow that helps you cut through the noise.
The good news is, you don't have to do it all manually. AI-powered tools are getting incredibly good at handling these repetitive setup tasks, which lets you jump straight into the creative work.
Comparing Manual vs AI-Assisted Editing Workflows
To see just how much of a difference this makes, let's compare a traditional editing workflow to one that incorporates AI assistance. The time savings add up quickly.
| Editing Stage | Traditional Manual Approach | AI-Assisted Approach | Key Benefit |
|---|---|---|---|
| Ingest & Organization | Manually creating folders, importing, and sorting every file. Can take 15-30 minutes. | AI tools auto-create folder structures and sort media based on type (A-roll, B-roll, audio). | Instant organization, saving initial setup time. |
| Rough Cut | Manually scrubbing through footage to find takes, cutting out pauses and mistakes. Can take hours. | AI generates a text-based transcript; you edit the video by editing the text. | Drastic reduction in time spent on the initial cut. |
| Audio Cleanup | Manually applying noise reduction, leveling dialogue, and mastering audio. Requires technical skill. | One-click AI tools like "Enhance Speech" remove background noise and balance levels automatically. | Broadcast-quality audio without the steep learning curve. |
| Captions | Typing out captions by hand or using a slow, inaccurate auto-generator that needs heavy correction. | AI generates highly accurate, timed captions in minutes. | Saves immense time and improves accessibility. |
As you can see, integrating smart tools doesn't replace your creativity; it just removes the tedious, time-consuming parts of the job.
Using a tool like Tubentum, for example, can automate many of these workflow steps, giving you a huge head start. If you're looking for more ways to make your process smoother, check out our list of essential creator resources.
Shape Your Story and Cut the Clutter
Alright, your footage is in the timeline and ready to go. This is where the magic really starts. The first pass through your A-roll is all about transforming a raw, sometimes rambling, recording into a tight, coherent story.
Think of it as the "rough cut" phase. You're not aiming for perfection here; you're just building the foundation. It's like a sculptor chipping away at a block of marble, removing everything that doesn't look like the final statue. Your job is to find the core message and cut away all the fluff that gets in the way.
Master the Art of the Decisive Cut
First things first: get rid of the obvious mistakes. Every creator messes up during recording. We stumble over words, cough, or repeat a line a few times to get it right. This initial edit is your chance to clean all that up, leaving you with only the best takes of each sentence.
You have to be a little ruthless here. If a line doesn't add real value, get rid of it. If a pause drags on too long, shorten it. This is also your moment to hunt down and destroy all those little filler words that can make your video feel less professional.
- "Ums" and "ahs" are the big ones. They make you sound hesitant and can undermine your authority on a topic.
- Repetitive phrases like "so," "like," or "you know" can become distracting if you say them too often. Cutting them out instantly makes your delivery sound more confident.
- Long pauses kill momentum. While a deliberate, dramatic pause has its place, unintentional dead air is just an invitation for your viewer to click away.
Going through your entire timeline to manually find every single "um" is painfully slow. This is exactly where text-based editing tools become a lifesaver. For instance, Tubentum can automatically find and slice out all those filler words and long silences for you. It can save you hours of grunt work on every video, letting you focus on the creative side of the edit instead of the tedious cleanup.
Strategically Use Jump Cuts for Pacing
When you cut a mistake out of a single continuous shot, you create what's called a jump cut. The subject appears to "jump" slightly from one position to the next. Not too long ago, this was considered a sign of amateur editing. Today, it’s a standard technique in the YouTube world to keep the energy high and the pace moving.
The trick is to make them feel intentional. An edit that's too jarring can be distracting, but a clean jump cut can make your video feel much more dynamic. Don't worry if a few feel a bit abrupt right now; you can always hide them later with B-roll or a quick zoom-in. For now, just focus on making the dialogue flow smoothly.
A well-paced video feels shorter than it is because the viewer is constantly getting new information without any lulls. Your job as an editor is to remove every moment of friction that might break that engagement.
Build a Powerful Hook in the First 15 Seconds
You have a very small window—maybe just a few seconds—to convince someone your video is worth watching. The structure of your intro, or your "hook," is probably the most important part of your entire edit. It needs to immediately answer the viewer's silent question: "What's in this for me?"
Your hook needs to make a promise and create curiosity, fast.
Here are three tried-and-true hook formulas you can build right in this first editing pass:
- The Question Hook: Kick things off with a question you know your ideal viewer is asking. Something like, "Are you struggling to make your videos look professional?" This speaks directly to their problem and promises you have the solution.
- The Result-First Hook: Show off the amazing final result right at the beginning. If it’s a tutorial, show the cool thing you made before you explain how you did it. "I'm going to show you exactly how to do this in the next five minutes." It hooks them by proving the value upfront.
- The Story Hook: Drop the viewer right into the middle of a compelling story. Skip the slow build-up and start with a moment of high tension. For example, "I almost deleted my entire channel, and it all came down to this one mistake."
Your entire intro should be no longer than 15-20 seconds. Go through your footage, find the most powerful or intriguing clip, and drag it to the very beginning. By building a strong hook and cutting the clutter, you're not just editing clips together—you're crafting an experience designed to grab and hold attention from start to finish.
Layer in Audio and Visuals That Engage
Alright, you've got the raw structure of your video sorted out. Now comes the fun part—adding the layers that take a simple talking-head video from "good enough" to genuinely professional and engaging. This stage is all about tackling two massive factors in viewer retention: audio quality and visual variety.
You’ve probably heard this a million times, but it’s the golden rule for a reason: viewers will put up with a slightly shaky camera, but they will click away in a heartbeat for bad audio. Clear, crisp sound isn't just a technical box to check; it builds trust and makes your content feel effortless to watch.
Make Your Audio Clean and Professional
Bad audio is anything that pulls focus from your message. It could be the low hum of an air conditioner, volume levels that are all over the place, or a voice that sounds like it was recorded in a tin can. The good news is, fixing these issues is more straightforward than you might think.
Your first pass should be on background noise. Pretty much any modern editing software has a noise reduction filter. My advice? Apply it gently. If you push it too hard, you’ll get that weird, robotic, underwater sound. The goal is just to kill the distracting hum, not strip all the natural warmth from your voice.
Next, it’s time to level the audio. Your voice will naturally get louder and softer as you talk, but your viewers shouldn't have to keep reaching for the volume knob. This is what the compressor tool is for. It squashes the loud parts and boosts the quiet ones, creating a smooth, consistent listening experience from start to finish.
Key Takeaway: The goal of audio editing is for the audio to become unnoticeable. When it's done right, the viewer forgets they are listening through a microphone and simply absorbs your message.
Finally, you can give your voice a bit more presence with EQ (equalization). You don't need to be a sound engineer here. A small boost in the mid-range frequencies can add a ton of clarity, while cutting some of the low-end can get rid of any boomy or muddy sounds. Many tools even have presets like "Podcast Voice" that are a fantastic place to start.
Weave in B-Roll to Show, Not Just Tell
With your audio sounding pristine, it’s time to give the visuals some love. Let’s be honest, staring at one static shot for ten minutes is a recipe for boredom. This is where B-roll saves the day. B-roll is simply any extra footage you cut in to provide context and keep things visually interesting.
But great B-roll does more than just hide your jump cuts; it actually reinforces what you're saying.
- Illustrate Your Points: Talking about a specific software? Show a screen recording of you using it. Discussing a concept? Find some stock footage or make a quick graphic that visualizes it.
- Maintain Pacing: Quick cuts to relevant B-roll clips can inject a shot of energy, keeping the viewer's eyes from glazing over.
- Establish a Mood: Cinematic shots of your workspace or a few slow-motion clips can create a specific vibe that complements your main footage.
For instance, if you're explaining a complex step in a tutorial, don't just describe it. Cut away to a screen recording that shows the process in real-time. That visual confirmation makes your instructions ten times easier to follow.
Use Graphics and Transitions With Purpose
Beyond B-roll, simple graphics and transitions are your best friends for clarity and flow. A quick text overlay can hammer home a key takeaway, introduce a new topic, or just display a name or a statistic you mentioned.
Just keep your on-screen text clean and legible. Pick a font that's easy to read, and maybe add a subtle drop shadow or background shape to make sure it pops against your video.
Transitions are the glue that holds everything together. Your software probably has a library of wild, flashy options, but honestly, the best transitions are the ones you barely notice.
| Transition Type | Best Use Case | Why It Works |
|---|---|---|
| Simple Cut | The default for most edits. | It's invisible and keeps the pace moving without distraction. |
| Cross Dissolve | To show a passage of time or a shift in location. | It creates a soft, gentle transition between two distinct scenes. |
| Smooth Zoom | To hide a jump cut or emphasize a point. | Adds a dynamic feel and directs the viewer's focus seamlessly. |
The best editors are intentional with their transitions; they aren't just for decoration. For most of your video, a simple, clean cut is all you need.
As the creator economy keeps growing, audience expectations are only getting higher. By 2025, YouTube’s monthly active user base is projected to hit 2.5 billion globally, and we've already seen a 35% increase in 4K video uploads in recent years. This points to a clear demand for higher production quality, making polished audio and visuals more critical than ever. For more advanced editing techniques and workflow ideas, you might be interested in the articles on the https://tubentum.com/blog.
Polish Your Edit for a Professional Finish
Alright, the heavy lifting is done. You’ve got a solid structure, clean audio, and your B-roll is in place. Now comes the fun part—adding that final layer of polish that makes your video look and feel truly professional.
Think of it like this: you’ve built a solid car with a powerful engine. This next stage is the custom paint job, the detailed interior, and the final wax. It’s what elevates the entire experience for your viewer.
Bring Your Visuals to Life with Color
Color is one of your most powerful tools for setting a mood, and it's something too many creators overlook. This process really breaks down into two distinct phases: correction and grading.
Color correction comes first. This is the technical step of just making your video look right. You're aiming for a clean, natural baseline that reflects what the human eye would see.
- Fix Your White Balance: Does your footage look a little too orange or blue? The goal here is to make the whites in your shot look genuinely white. You can usually find a white balance tool or a "color temperature" slider to dial this in.
- Balance the Exposure: If your shot is too dark or washed out, play with the exposure, shadows, and highlights. You want to see detail in both the brightest and darkest parts of the image without anything being completely blown out or crushed to black.
With a clean base, you can move on to color grading. This is where your artistic vision comes in. Grading is all about applying a specific "look" to evoke a feeling.
Want that modern, cinematic vibe? Try pushing the teals and oranges slightly. Going for a more serious or dramatic tone? Pulling back on the saturation can work wonders.
A great way to get started is by using LUTs (Look-Up Tables). Think of them as color presets you can apply with a single click. Most editing software comes with a few built-in, giving you an easy entry point to explore different styles.
Stabilize Shaky Handheld Footage
Nothing gives away an amateur video faster than shaky, jarring footage. If you filmed any B-roll handheld, you probably have some minor camera shake to contend with. Fortunately, the stabilization tools in modern editing software are almost magical.
Look for an effect called "Warp Stabilizer" or something similar. In most cases, you can just drag it onto your clip, and it will analyze the footage to digitally smooth out the bumps.
You can often tweak the "smoothness," but be careful not to overdo it. Pushing it too far can sometimes introduce a weird, jelly-like warping at the edges of the frame. A subtle touch is usually all you need.
Pro Tip: Stabilization is a fantastic tool for fixing minor jitters, but it can't save a train wreck. It's always better to get the steadiest shot you can in-camera rather than relying on fixing it in post.
Add Captions for Accessibility and Retention
Captions are no longer a "nice-to-have"—they're a must. A huge number of people watch videos with the sound off, especially on their phones. Captions make sure your message still lands. Plus, it makes your content accessible to viewers who are deaf or hard of hearing.
But let's be honest, typing out captions by hand is a soul-crushing task. This is where a tool like Tubentum can save you hours of tedious work. It auto-generates incredibly accurate, timed captions in a matter of minutes. From there, you just need to do a quick review, make any small tweaks, and you’re ready to go.
Drive Action with a Clear Call-to-Action
You've delivered value and kept your viewer engaged. Now, what do you want them to do next? A strong call-to-action (CTA) is what turns a passive viewer into a subscriber, a lead, or a customer.
Keep it simple and direct. You can weave your CTA in a few effective ways:
- Verbally: Just ask! "If you got value from this video, hit that subscribe button so you don't miss the next one."
- On-Screen Graphics: A simple text overlay or an animated arrow pointing to the like or subscribe buttons works great.
- YouTube End Screens: In the last 20 seconds of your video, use YouTube’s built-in end screen feature to add clickable links to another video or your subscribe button.
The key is not to overwhelm them. Pick the single most important action you want them to take and make it incredibly easy to do. This final step is absolutely critical for growing your channel.
Getting It Out the Door: Export and Optimization

You've made it. The story is tight, the audio is clean, and the visuals look great. But all that hard work can fall apart at the final hurdle. Exporting your video with the wrong settings is a surefire way to make it look blurry or pixelated once it hits YouTube.
I like to think of exporting like developing a photograph. You can capture a perfect shot, but if the development process is flawed, the final print will be a huge letdown. Getting your export settings right ensures the video you upload looks just as crisp as it did in your timeline.
The good news? You don’t need a degree in video compression. YouTube has its preferences, and if you give the platform what it wants, your video will look its best.
Your Go-To YouTube Export Settings
Most modern editing software—whether you're on Premiere Pro, DaVinci Resolve, or Final Cut Pro—comes with a built-in "YouTube" or "H.264" export preset. This is almost always your best bet and gets you 90% of the way there.
Still, it pays to quickly double-check a few key settings to guarantee you’re sending YouTube the highest quality file possible.
Here's a quick rundown that works for just about any editor:
- Format: Stick with H.264. You'll also see it labeled as MP4 or MPEG-4. It's the gold standard for web video, balancing quality and file size perfectly.
- Resolution: Always export at your native timeline resolution. If you edited in 1920x1080 (1080p), export in 1080p. Don't try to upscale to 4K—it won't add any real quality and can actually make things look worse.
- Frame Rate: This one’s easy: just match it to your project. If you shot and edited at 30 fps, export at 30 fps.
- Bitrate: This is the one that often trips people up. For a crisp 1080p video, a target bitrate between 10-15 Mbps is a solid choice. For 4K, you'll want to bump that up to 35-45 Mbps. Variable Bitrate (VBR) is usually the best option if you have it.
Getting this right is non-negotiable. YouTube re-compresses every single video uploaded to its platform. By giving it a high-quality source file, you minimize the quality loss that happens on their end.
The goal isn't just to finish the video; it's to deliver it to your audience in the best possible condition. A clean export respects all the work you put in and, more importantly, it respects the viewer's time.
Setting Your Video Up for Discovery
Once that file is exported, you're only halfway there. Now you have to make sure people actually find it. This is all about optimizing the metadata you give YouTube when you upload.
This is your chance to tell the algorithm what your video is about, which is absolutely critical for getting it recommended to the right viewers. As the platform gets more crowded, creators are looking for every advantage they can get. It's no surprise that by 2025, the number of users subscribing to premium video solutions is expected to hit around 48.22 million worldwide. You can discover more insights about the growth of video editing tools and see why optimizing is so key.
For every single upload, make sure you nail these four things:
- Craft a Killer Thumbnail: Your thumbnail is your video's billboard on a very busy highway. Make it bright, clear, and intriguing. A high-contrast image with a bit of easy-to-read text that hints at the video's value works wonders.
- Write a Search-Friendly Title: A great title is both searchable and compelling. It should include your main keyword but be phrased in a way that sparks curiosity or promises a clear solution to a problem.
- Build a Value-Packed Description: The first couple of lines are crucial because they show up in search results. Use them to summarize the video and drop in your keywords naturally. Below that, add helpful links, timestamps, and any other relevant info.
- Choose Smart Tags: Tags aren't as powerful as they once were, but they still help YouTube contextualize your content. Add your main keyword, a few variations, and some broader topic tags that fit the video.
This last bit of work is what connects your beautifully polished video with an audience that's actively looking for it. Don't skip it.
Common YouTube Editing Questions Answered
When you're diving into YouTube, editing can feel like a huge puzzle. You've got the footage, but what's next? Let's tackle some of the most common questions creators have when they're figuring out how to edit videos and get their channel off the ground.
What Is the Best Software for Editing YouTube Videos?
Honestly, the "best" software is whatever gets the job done for you right now. You don't need to spend a fortune to get started.
Free tools like DaVinci Resolve or CapCut are incredibly powerful and more than enough for beginners. They give you all the features you need to create clean, professional-looking videos without dropping a dime.
Once you get the hang of things and your channel starts to grow, you might find yourself wanting the advanced features in programs like Adobe Premiere Pro or Final Cut Pro. The trick is to focus on learning the core principles first—things like pacing, storytelling, and getting your audio right. Master those, and you'll know exactly when (and if) you need to upgrade.
How Long Should It Take to Edit a 10-Minute Video?
This is the classic "it depends" question, but I can give you some real-world numbers. For a simple talking-head video with just a few graphics, a seasoned editor might knock it out in 3-5 hours. If you're just starting out, plan for more like 8-12 hours to find your rhythm and learn the software.
Of course, a video with custom animations, complex sound design, and multiple camera angles could easily take a few days. That’s where your workflow makes all the difference.
The goal isn't just to work hard; it's to work smart. The single fastest way to cut down your editing time is to automate the repetitive, soul-crushing tasks so you can focus on the creative side of things.
This is where smart tools come into play. For instance, using a platform like Tubentum to automatically handle things like silence removal and cutting filler words can slash your editing workload by more than 50%. It’s a total game-changer.
How Can I Make My Edits More Engaging?
Engagement comes down to one thing: keeping the viewer’s attention. Our brains get bored fast, so you have to keep things fresh and dynamic.
- Quick Cuts are Your Friend: Don't be afraid to use jump cuts to tighten up your delivery and maintain a high-energy pace.
- Show, Don't Just Tell: If you're talking about a product or a concept, cut to B-roll footage that shows it in action.
- Simple Text Can Go a Long Way: Use text overlays to emphasize key takeaways or add a bit of personality.
- Sound Is Everything: The right background music and a few well-placed sound effects can completely change the feel and energy of your video.
At the end of the day, though, the most engaging videos have two things in common: a clear message and crystal-clear audio. Get those right, and you’re already halfway there.
Ready to cut your editing time in half? Tubentum automatically removes silences, filler words, and bad takes, turning your raw footage into a polished rough cut in minutes. See how it works at https://tubentum.com.